Description (Some HTML is OK)
Chocolate & Rose Battenberg
Ingredients
Makes 0 servings
- For the chocolate sponges
- 225g very soft salted butter, plus a little extra for greasing
- 225g golden caster sugar
- 175g self-raising flour
- 85g ground almonds
- 50g cocoa powder
- 3 large eggs
- 1 tsp vanilla extract
- 140g natural yogurt
- For the rose sponges
- 200g self-raising flour
- 225g very soft butter, plus a little extra for greasing
- 225g golden caster sugar
- 3 large eggs
- 85g ground almonds
- 1½ tbsp rose water
- 100g natural yogurt
- pink food colouring
- To assemble and ice
- jar of raspberry jam
- 200g bar of dark chocolate
- 200ml pot double cream
- 25g butter
- dried rose petals to decorate
Preparation
Heat oven to 160C/140C fan/gas 3. Grease and line the base of 2 x 18cm round sandwich tins (I have used 20cm in the past and the recipe still works but you will need to use different size cutters…)
1. Make the chocolate sponges first. Put all the ingredients in a bowl and beat with an electric whisk until the mixture comes together smoothly. Weigh the micture and spread half in each tin. Bake for 30 mins (when you poke a skewer into the middle, it should come out clean). Cool in the tins for 15 mins, then turn out onto wire racks to cool fully while you make the rose sponges.
2. Grease and line tins as before. Add the flour, butter, sugar, eggs, almonds, rose water and yogurt, and beat together. When smooth, beat in some pink food colouring bit by bit until you get a rich colour – it will fade a lot during baking so add a good bit more than you think! Weigh, divide between the tins and bake and cool as before.
3. Once cool, gently cover and chill the sponges for 30 mins – this will make cutting them much easier.
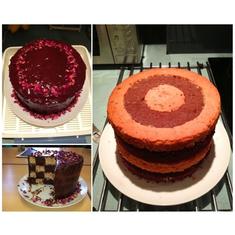
4. Unwrap the sponges and cut a 12cm-diameter circle out of the centre of each sponge using a biscuit cutter or paper template. Then cut a 6cm-diameter circle from the centre of your 12cm sponge. From each sponge, you should end up with a 6cm circle, a 12cm ring and an 18cm ring. Swap the middle rings of the chocolate sponges with the middle rings from the rose sponges, and fit the cut pieces back together. Handle the sponges very gently to avoid cracking the edges too much – the outer ring is most prone to splitting but it is easy to rejoin the pieces with a bit of raspberry jam to seal the joints.
5. Heat the jam to melt it a bit. Generously brush over one of the sponges and top with an alternating sponge. Repeat to stack up all the layers. Sit the cake on a serving plate.
6. Break the chocolate into a heatproof bowl with the cream and butter. Set over a pan of barely simmering water so the bottom of the bowl doesn’t touch the water, and very gently melt together. Cool until slightly thickened and more spreadable, then spread all over the cake to finish. Once the chocolate begins to set a little, decorate with dried rose petals. You don’t need to put it back in the fridge – the cake will keep for a couple of days at room temperature.
7. Eat!
*I also make a chocolate/orange version of this cake using orange blossom water which is equally delicious (I use apricot jam instead of raspberry to seal this one) but obviously the rose version seemed more appropriate here :)
Comments
Back to top